The CMMS Discussion Group: What We Have Learned
![]()
May 2024 No. 84
The CMMS Discussion Group: What We Have Learned
by Karol S. Young, OTD, OTR/L, CHT
Did you know BraceLab sponsors a free online CMMS discussion group? This group developed a year ago to provide information and support to therapists interested in learning Judy Colditz’s technique of Casting Motion to Mobilize Stiffness (CMMS) for treatment of the stiff hand. Every other month, four knowledgeable and dedicated therapists (Johanna Jacobson-Petrov, OTR/L, CHT; Katie Pisano, OTR/L, CHT; Kantessa Stewart, OTR/L, CHT; and Karol S. Young, OTD, OTR/L, CHT) lead an online discussion to share CMMS case studies, treatment observations, and to answer questions. To disseminate this information more widely, here are some reflections of what we have learned this past year.
1. The consensus has been that no patient we have treated has experienced a negative effect from using the CMMS treatment technique. A patient may end the cast wear too soon and lose some motion gained, or the improved motion may not be what is hoped for, but none of the discussion leaders have had a patient who has experienced detrimental effects from the immobilization of CMMS. Yes, there may be some temporary joint stiffness of the immobilized joints, but that resolves over time.
2. When applying the CMMS cast, a helpful tip is to draw lines on the volar surface of the PIP joint to help you know where to end the cast. This ensures that active PIP joint flexion is not blocked by the cast. This mark also provides visual input for the patient, helping them specifically bend their fingers at the PIP joint within the CMMS cast (See Figure 1).
3. Place dots on the CMMS cast at the base of each finger and instruct the patient to touch the dots (See Figure 1). This ensures the patient is performing an active hook motion to its maximum effect—i.e. including some active metacarpophalangeal (MP) joint extension while also flexing the IP joints.
4. To determine the best position for CMMS casting, hold the patient’s wrist and hand in the position you plan to apply the cast. Observe the patient’s active motion while you are holding to ensure you are obtaining the desired movement pattern. Asking the patient, “Where do you feel the pull?” helps determine if this is an effective cast position to reach the motion goal of the cast.
5. If your patient lacks both flexion and extension of the interphalangeal (IP) joints, you may need to place the MP joints in 45 degrees of flexion in the CMMS cast to allow both active IP joint flexion (preventing MP joint hyperflexion) and to provide reverse blocking to prevent MP joint hyperextension, thereby facilitating IP joint extension (See Figure 2).
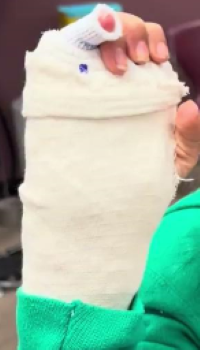
Figure 1: Cast which blocks MP joint but allows IP joint flexion and extension. Note the dot on the cast that is the target for the fingertip.
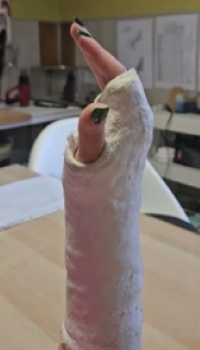
Figure 2: MP joints are positioned in 45 degrees of flexion in the CMMS cast to facilitate both flexion and extension of the IP joints.
6. If the patient’s motion has plateaued then it is time to move to a different cast design. After removing the cast, reevaluate the pattern of motion and determine the one motion most needed to regain function. That motion becomes the goal of the next cast.
7. Moving the fingers into an active hook against the resistance of exercise putty or balloons pulled over the fingertips provides proprioceptive feedback which encourages DIP joint flexion (See Figure 3).
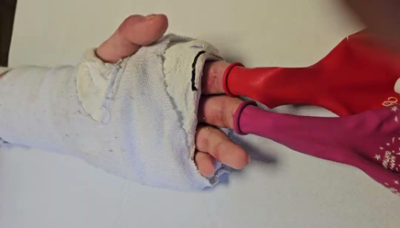
Figure 3: Placing balloons over the fingertips to provide resistance against flexion.
8. During the CMMS cast application, use room temperature water and a type of plaster of Paris with a lower set time to allow you extra time to place the patient in the desired position. Never use hot water as the setting temperature can cause harm. To improve your casting skills, practice on friends and co-workers.
9. For the patient’s protection and comfort, use a zip stick between the cast and the skin for use when removing the CMMS cast (See Figure 4). This tool provides a protective layer between the cast saw and the skin, and is especially helpful by adding an extra layer of confidence for inexperienced therapists or anxious patients.
10. Apply elastic sports adhesive tape around the cut edges of a bi-valved CMMS cast. The tape both seals the edges of the cast and is comfortable against the patient’s skin (See Figure 5).
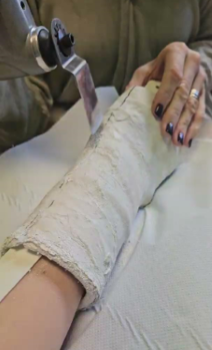
Figure 4: Using a zip stick under the cast when removing it improves patient comfort and reduces anxiety.
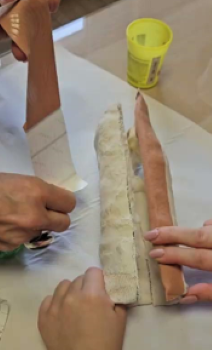
Figure 5: Applying elastic adhesive tape to the edges of the CMMS cast when it is bi-valved.
Judy Colditz, OT/L, CHT, FAOTA initiated the CMMS Discussion Group and her passion for hand therapy has inspired us to follow her motto: ” When you learn it, teach it.” If you are interested in the CMMS technique, please join us. This is a live online discussion group; recordings are not available. Sign up here if you would like to receive notices of the dates and times of the Online CMMS Discussion Group meetings.
If you have successfully used the CMMS technique and have ideas to share, please send them to us at support@bracelab.com so we can PASS THEM ON!
Download Clinical Pearl No. 84, The CMMS Discussion Group: What We Have Learned, May 2024
© BraceLab; 2024 all rights reserved
Disclaimer: BraceLab Clinical Pearls are intended to be an informal sharing of practical clinical ideas; not formal evidence-based conclusions of fact.