
How to Measure for a Brace: Wrist, Knee, Thumb, Ankle - Complete Sizing Guide
|
How to Measure for a Brace: Wrist, Knee, Thumb, Ankle - Complete Sizing Guide |
Getting the right brace fit changes everything: comfort, healing time, and how much support you actually get.
Whether you're buying a wrist splint after a sprain, a knee brace for running, a thumb support for osteoarthritis, a foot brace for plantar fasciitis or an ankle brace to prevent recurring rolls or for drop foot, measuring properly is the first step.
This brace sizing guide walks you through clear, practical measurement steps for wrist, knee, thumb, foot and ankle braces, explains common fit issues, and helps you use sizing charts so you order the right size the first time.
Why Accurate Sizing Matters
Correct sizing isn't just about comfort; it directly affects performance and healing. A brace that's too tight can cut circulation, increase swelling, or cause numbness. Too loose and it won't stabilize the joint, rendering the device ineffective and possibly increasing injury risk. Accurate sizing also avoids wasted money and returns.
For compression braces, the right tension controls swelling and improves proprioception or joint awareness. For rigid or semi-rigid braces, precise fit ensures the support elements sit over the bone and ligaments they're meant to protect. Finally, many manufacturers' warranties and clinical guidelines assume you're using the correct size, so measuring properly matters for safety, outcomes, and value.
General Measurement Tips Before You Start
Tools You Need
- Flexible cloth measuring tape - preferred. If you don't have one, use a piece of string and measure the string against a ruler.
- Pen and paper or notes app to record measurements.
- A thin sock or sleeve if measuring over clothing - only when instructed.
- A second person to help for hard-to-reach areas like knees and ankles.
How to Measure Correctly - Technique Tips
- Measure directly on skin or over the thin layer of clothing the brace will sit on. Thick clothing changes circumference.
- Keep the tape snug but not compressing the skin; you want the resting circumference. If the tape compresses soft tissue, you'll undersize the brace.
- Take each measurement twice and use the average if they differ.
- Note left vs. right, limbs often differ; always measure the side you'll wear the brace on.
When to Measure - Time of Day and Swelling Considerations
- Measure at the time of day you expect to wear the brace. Swelling is common by evening; sizing in the morning can understate evening circumference.
- If swelling fluctuates after activity or prolonged standing, measure when slightly swollen for a comfortable daily fit.
- For acute injuries with significant swelling, consult a clinician. You may need an adjustable brace or to re-measure once swelling subsides.
How to Use Sizing Charts and Convert Units
- Most manufacturers list sizes such as S, M, L with a measurement range in inches or centimeters. Match your exact measurement to the range, not the visual size.
- If your measurement sits on the border between sizes, choose the larger size for rigid braces and the smaller size for compression braces if you tolerate firm compression.
- Convert units: 1 inch = 2.54 cm. If a chart is in centimeters and you measure it in inches, multiply inches by 2.54.
- Pay attention to multiple measurements; some knee and ankle braces require two or more circumferences plus a shoe size. BraceLab's sizing charts include detailed measurement instructions for each brace type to help you get the right fit.
Wrist Brace Sizing
Measurements Required - Circumference and Wrist-to-Forearm Length
For most wrist braces, you'll need:
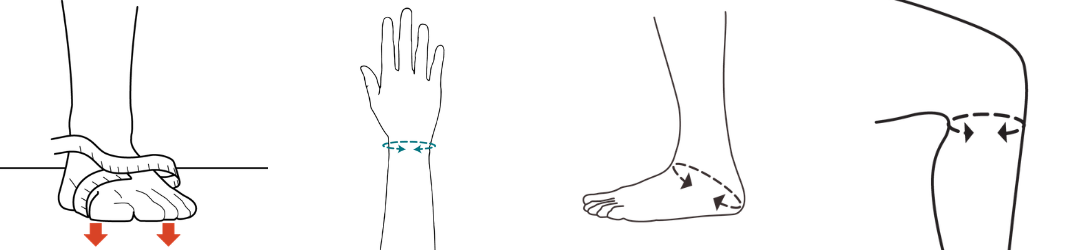
- Wrist circumference around the narrowest part of your wrist, just above the wrist joint.
- Optional: wrist-to-forearm length - the distance from wrist crease to a point 3-4 inches up the forearm for long-support splints.
Step-by-Step Wrist Measurement Guide
- Rest your hand palm-up and relax the wrist. For the most accurate result, ensure to measure with the wrist in a neutral position.
- Wrap the tape around the narrowest point of your wrist, just above the joint where your hand meets your arm.
- Record the number to the nearest 1/8 inch or 0.5 cm.
- If buying a long wrist splint, measure from the center of the wrist crease up the forearm 3-4 inches; that's the splint length the manufacturer will reference.
Choosing the right fit and common fit issues
- Fit: A correct wrist brace should limit painful motion but let your fingers move freely. The splint plate, if present, should align with the underside of your wrist.
- Too tight: tingling, cold fingers, color changes. If this occurs, re-size or loosen straps.
- Too loose: brace slides when you move, or rotation of the splint occurs. Use a smaller size or an adjustable wrap.
- Tip: If you have thin wrists but broad hands, check both wrist circumference and hand width if the manufacturer lists it to avoid slippage.
Explore wrist braces designed for proper support and comfortable daily wear.
Knee Brace Sizing
Measurements Required - Multiple Circumferences and Knee Center
Knee brace measurement often needs several measurements:
- Circumference above the knee - typically 4-6 inches above the patella.
- Circumference at the knee center around the patella.
- Circumference below the knee - 4-6 inches below the patella.
- Some braces require distance from mid-thigh to mid-calf or a note of your height/weight for sizing charts.
Step-by-step knee measurement guide
- Sit with the knee bent at 30 degrees - a small rolled towel behind the knee helps maintain the angle.
- Locate the center of the kneecap, the patella, and mark it mentally or with a washable pen.
- Measure the circumference at the patella - knee center.
- Measure 4-6 inches above the patella and record that circumference.
- Measure 4-6 inches below the patella and record that circumference.
- If a brace requires leg length, measure from mid-thigh to mid-calf with the knee slightly bent.
Selecting brace style based on measurements and support needs
- Compression sleeves: rely mainly on knee-center circumference. Choose snug fit for proprioception, but not so tight that you restrict circulation.
- Hinged or stabilizing braces: need accurate above/below measurements so the hinge aligns with the joint axis. If you're between sizes, pick the larger size and use straps to secure fit.
- Unloader braces for osteoarthritis: require precise sizing and often custom adjustments; working with a fitter is recommended.
- If you're active like running or pivoting sports, consider a brace with adjustable straps and higher cut-to-shin measurements for stability.
Find the right fit with knee braces built for accurate support and active use.
Thumb Brace Sizing
Step-by-Step Thumb Measurement Guide
Here's how to measure:
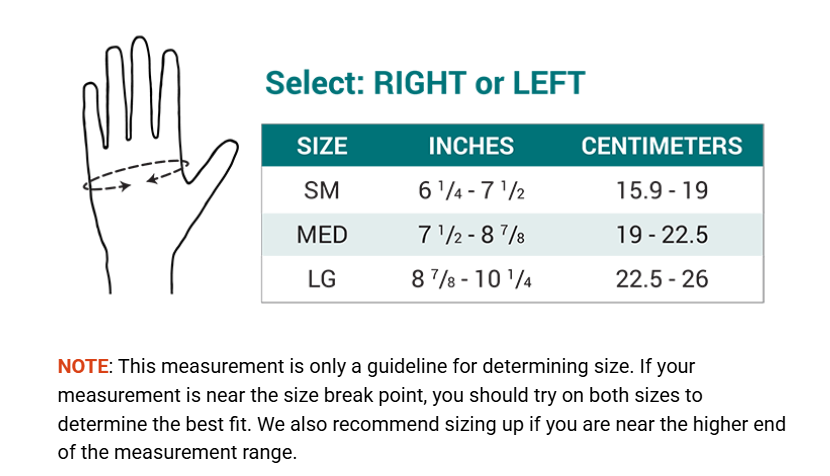
- Do a circumferential measurement just below the metacarpophalangeal joint to get the proper sizing (you can watch our brace sizing tutorial).
- If the measurement is close the size change, choosing the smaller size would be the way to go, especially if the hand is slim and thumb muscles are not overly developed. If you have a larger, thicker hand, with more prominent thumb muscles, you should opt for the larger size instead.
- When unsure, it's best to try on both sizes and assure an accurate fit, as that will be the key to your recovery. (don't worry, with our fit guarantee, you can exchange sizes without additional costs)
Bracelab offers a range of thumb braces for targeted support and secure fit across different injury types.
Ankle Brace Sizing
Measurements Required - Ankle Circumference, Shoe Size, and Calf if Applicable
Common measurements for ankle braces include:
- Ankle circumference around the narrowest point above the ankle bone - the malleoli.
- Shoe size - important for lace-up braces that fit inside the shoe.
- Calf circumference 3-4 inches above the ankle for calf-high supports.
Step-by-Step Ankle Measurement Guide
- Sit with your foot flat on the floor and your ankle at 90 degrees.
- Wrap the tape around the narrowest point of your ankle, just above the malleoli. Record the measurement.
- If required, measure calf circumference 3-4 inches above the ankle and note your shoe size.
- For braces that report left/right differences, measure both ankles; recurrent ankle-injury patients often have asymmetry.
Choosing Compression Level and Lacing/Strap Options
- Low compression for mild support: good for prevention during light activity. Choose a looser fit for long wear comfort.
- Moderate compression for stability and mild edema control: pick a snug fit that doesn't pinch. Ideal for rehab and daily support.
- High compression for post-injury use and managing swelling: select a brace with adjustable straps or lacing to dial tension; check circulation frequently.
- Lace-up braces mimic athletic shoe support and benefit from accurate shoe-size pairing. Stirrup or rigid braces require precise ankle circumference so the support legs align with the malleoli.
Shop ankle braces with adjustable compression and secure stabilization.
Conclusion
Measuring well takes two things: the right tools and a little patience. Use a flexible tape, record each measurement twice, measure the side you'll support, and pay attention to timing - swelling and activity change sizes. Match your measurements to the manufacturer's chart and remember the sizing rules of thumb: choose the larger size for rigid pieces if you need room for padding, and the smaller size for compression pieces when you want snug support.
When in doubt, especially after surgery or with significant swelling, consult a clinician or fitter. With accurate measurements, you'll get better support, less irritation, and faster progress toward recovery.
Need help finding the right brace and size? Visit BraceLab to explore sizing guides and product options, or contact us for personalized fit guidance.
Frequently asked questions
How do I measure for a brace to ensure the right fit?
Use a flexible tape measure on the skin or a thin layer of clothing. Record circumference where the brace will sit, such as wrist, ankle, or knee and any required lengths. Take each measurement twice, measure the side you'll wear the brace on, and match your numbers to the manufacturer's sizing chart.
What are the most important measurements for wrist brace sizing?
Keep the wrist in a neutral position, measure the wrist circumference at the narrowest point just above the wrist joint and, for long splints, measure wrist-to-forearm length from the wrist crease 3-4 inches up. Record to the nearest 1/8 inch or 0.5 cm and compare both values to the product chart.
How should I measure my knee for a brace that requires multiple circumferences?
Sit with the knee bent about 30 degrees and mark the center of the patella. Measure circumference at the patella, 4-6 inches above, and 4-6 inches below. If length is needed, measure mid-thigh to mid-calf with the knee slightly bent and note height/weight if the chart asks.
When should I re-measure for a brace because of swelling or activity?
Measure at the time of day you expect to wear the brace; swelling often increases by evening. If swelling fluctuates after activity or prolonged standing, measure when slightly swollen or consult a clinician for adjustable options and re-measure once acute swelling subsides for an accurate fit.
Can I use the same ankle measurement for lace-up and stirrup braces, and how does shoe size factor in?
Ankle circumference is required for both, but lace-up braces also need your shoe size to ensure fit inside footwear. Measure the ankle above the malleoli and, if the brace is calf-high, include calf circumference. Choose lace-up models sized to your shoe for proper in-shoe support.